One of the most common questions we are asked is “how do I prepare a song for mastering”. It’s an important stage to get right, as the quality of audio going into the mastering chain makes a big difference to the final result of the master.
When you’re looking for the best song mastering services, it helps even the best mastering engineer if your mix arrives nicely prepared. What if you have lost the project file & only have a rough mixdown? We’ll explore that scenario too.
Mixdown stage
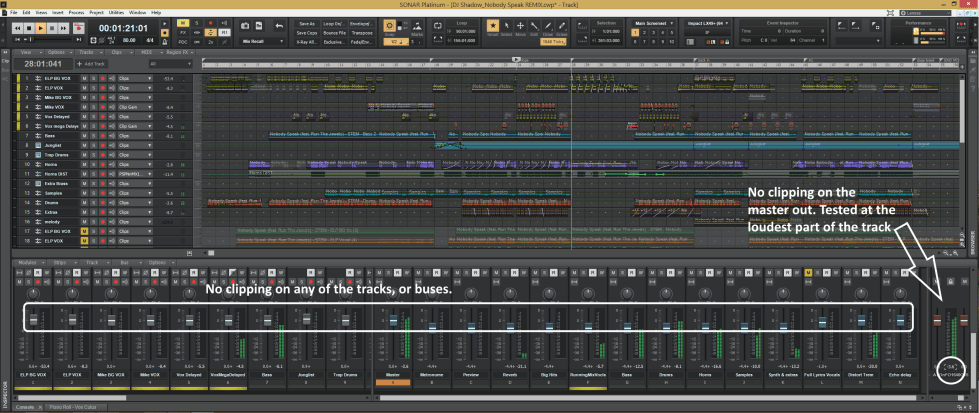
The golden rule: The levels on the WAV master recording you send should not be not clipping “in the red” at 0dB or more, anywhere in the song. If it is clipped then you lose transient definition, punch, it can distort – it’s worth getting it right pre-mastering.
To check if your mix is clipping: Check your master out level meter, and if it is showing in the red at the loudest part of your track then you must reduce the volume of all instruments equally going in to the master (e.g. turn each channel down by the same amount, for example -3dB), until there is no more clipping.
Ideally, by following good mixing practices there should be no clipping at all by the time you export your mix, but that is a topic in itself.
If you are not a mix-purist, then there is usually an easy workaround: On most modern DAW systems there is a dedicated Gain control on the master out (different to the volume fader on the master out). Turn the master input gain down until the loudest bit of your track peaks at around -1dB (no red on the volume meters anywhere in the track). This works because gain pulls the levels down going IN to your final bus. Note: this will NOT fix clipping that happens in individual tracks, you will still need to fix that issue first.
If you just turned the volume fader down on the master out instead of using the gain, then everything would still be mixed too loud (still clipping), & you would just be lowering the already-clipped audio level, so you would end up with a quiet but clipped file – the worst option!
Aim to deliver your mix peaking at around -3dB. An exact figure isn’t essential if you are working at 24 bit or higher as the quality is so good anyway. If you are not an audio-expert don’t stress – realistically you can deliver anywhere down to about -10dB (or even lower at 32 bit) and the end result will be fine. If your mix ends up with less than 3dB headroom don’t stress – we can easily adjust the input level this end anyway, no worries. The peak level of your mixdown does not affect the final level of your master.
Avoid panning any bass frequencies far left or right when you’re mixing. For today’s modern mixes it is absolutely standard to keep all bass frequency instruments panned in the center. We center the low end anyway as standard during mastering, but it’s best practice to just keep the low-end panned centrally.
Trim any sounds you don’t want to keep from the start and end of your song. It’s actually helpful to leave a little blank space at each end, in case we need to do some transparent noise removal.
File export options
When exporting your mix, there are several options which can seem very confusing.
File type: WAV or AIF / AIFF files are best for mastering. Either is good. These are “uncompressed” formats” meaning they do not lose any sound quality. In contrast a “lossy” format like MP3 is made a smaller file size by losing some of it’s detail, thus compressing the file size.
It’s important to note that the file type compression I just referred to is a completely different type of compression to dynamic compression. MP3 compression is only based around reducing file size, whereas dynamic compression is used to enhance the dynamics of instruments & mixes in the studio e.g. “the guitar sounds a bit weak, it needs more compression during the chorus”. For this the engineer would use a hardware or software compressor.
Sample Rate: this is how many times the computer takes a sample of the waveform per second. So for a 44.1 kHz sample rate the computer is checking the audio waveform 44,100 time every second! That’s pretty darn accurate, and is CD quality.
The original thought behind this seemingly random figure of 44,100 times per second is that the range of human hearing is around 20Hz – 20,000Hz (20kHz), so the theory is that 44.1kHz was twice as high frequency + a little bit more than the limit of human hearing. Nowadays technology has advanced, hard drive space is less of an issue so 96Khz sample rate is often seen for that extra level of detail.
It’s best to export your song at the same sample rate as the session was recorded in. Keeps it simple for you too.
Bit depth: a vitally important factor influencing the final quality of your audio. Also referred to as audio resolution. It’s essentially how accurate the audio file is represented. CD quality is 16 bit, but it’s far better to bounce down your audio at 24 or even 32 bit. With every 1 bit increase, the accuracy doubles. With higher bit depth your track can have a much higher dynamic range with a much lower noise floor. Starting off with a higher bit depth means the mastering can be performed on the highest possible quality file, so when the final master is bounced down to 16 bit (standard for digital distributors) it ends up at the highest quality possible.
Dithering: this is a way of smoothing the audio when the mastering engineer is bouncing down a final master from high bit depth to a 16 bit standard master. When exporting your song for mastering there is no need to apply dithering unless you are reducing bit depth (which you shouldn’t do). If your project is at 24 bit, then please export at 24 or 32 bit, & there will be no need to add dithering.
In a nutshell: It’s best to work with .wav or .aiff files. Exporting them at 24 or 32 bit is ideal, but 16 bit will do if it’s all you have. 44.1, 48 or 96 kHz sample rates are all great. We can also work with most other digital formats if necessary.
A stereo file is preferred – there is no need to export Right & Left channels as split mono.
Metadata & alt-versions
If you are sending an album for mastering, remember to supply the album name, band name (you’d be amazed how many people don’t tell me what their band is called!), track running order, ISRC Codes (if you have them) & your preference for gap times between tracks. Feel free to supply any additional notes you think will be useful.
It is sometimes helpful to provide an alt-mix with vocals 1.5dB higher than the main mix (especially for pop). This is to give the mastering engineer another option.
It is helpful to provide a couple of commercially released reference tracks you would like to emulate the vibe of. You can either send the tracks along with your order, or direct us to streaming links.
Carefully check the vocal stem for any plosives (popping P/B type sounds) & bad mouth noise. Remove that separately if possible. It is often helpful to send the vocal stem separately to give flexibility during the master. You can simply add extra stems for stem mastering along with your order.
Get instrumental versions mastered at the same time (versions with no vocals). It’s standard professional practice to get instrumentals done nowadays. This is useful for sync (getting music onto TV & film etc) & live backing tracks. Mastering an instrumental version at the same time as the full track is usually done at a reduced rate.
When naming your mixes, please use sequential numbers (or your own system) rather than “My Dope Track FINAL MIX”, as if you then need to resend a new mix we will get into the territories of “My Dope Track NEW FINAL”, “…NEW FINAL FINAL 3” etc. Much easier to get into a habit of sequential mix naming e.g. “My Dope Track_Mix 5”.
Effects and processing
Leave on any plugins & effects that are CREATIVE (e.g. flange, delay, chorus, distortion, creative EQ) as you know how you want these to sound better than anyone. It’s useful to export the reverb in a separate stem of its own.
Unless you are fully confident in your monitoring and room response, switch off any plugins and effects that are CORRECTIVE (compression, corrective EQ) and export without these effects applied. You can send us a note if you have any specific concerns about your mix, or use our popular mix evaluation service pre-mastering.
Please remove any limiters or heavy compression from your DAW’s master out bus. Especially remove limiters – Asking a mastering engineer to work on a mix that has already been heavily limited could be likened to a chef being asked to create a gourmet meal from ingredients which have already been cooked. It would still taste OK, but using fresh ingredients would give better results. Over zealous use of “Loudness Maximizers” before the mastering stage is generally undesirable. Proper mastering is dependent on being able to subtly adjust the dynamic range of a track to get the best overall sound, bounce & vibes. Limiters can kill dynamic range if not used carefully, making the mastering engineer have to fight against the processing that’s already there.
If you have done a self-master then it can be useful to send it too as a reference, to show us where your head is at. Tell us what you like and don’t like about it. Likewise if you have had disappointing results with another mastering engineer then send their master too and tell me what you do and don’t like about it. – we will ensure ours is better!
Extra steps to prepare for a mixing job
You may not see the point in putting much effort into your mix before paying a pro to finish it, but it really does speed the process up in getting on the same page with the mix engineer. Please make your mix as good and close to how you want it as you can. They say a picture tells a thousand words, and for us hearing your best/closest mix is better than any description you can write. It gives us a great framework to jump off from, and ensures we start from a place that’s close to your heart.
An analogy – you could try & describe in words the difference between honey & sugar, but that will only get you so close… Or you could say “Open your mouth – THIS is honey, THIS is sugar” which makes everything immediately clear. Getting your mix close before sending it speeds everything up & avoids pointless revisions. Show me “THIS is what I want!”.
Follow the headroom advice above, but make sure each individual channel on your mix is free of clipping, not just the master out. You may have to lower all the volume faders down a few dB (lower them all by the same amount to preserve your mix).
Understand that the final result will always reflect the quality of what is put in. Obviously nobody can make a £50 guitar sound exactly like Jimi Hendrix’s guitar chain, or magically turn a cheap USB mic recording into a Neumann, so please have realistic expectations if you are using lo-fi equipment – If a £50 mic was as good as a £3000 mic, then nobody would ever use the expensive ones, right?
When you are ready please export individual instrument tracks from your DAW. If there’s options like Select the option that’s closest to “what you hear” – you want to export all your creative effects & your overall mix levels exactly how you hear them.


Saving the unsavable – when a mixdown turns bad!
Sometimes disaster strikes and your hottest new tune’s project file gets corrupted. Typically in these situations, it’s the only project you haven’t backed up yet, & you only have a rough master recording which is crunched, or severely imbalanced. What a pain in the butt!
Do you try & remake the whole project again? Or drop the whole idea, lick your wounds & start something new? Maybe neither… An experienced mastering engineer can usually improve things dramatically. Magic can be done in the mastering process and improve the track tremendously. The old saying “you can’t polish a turd” doesn’t always ring true – sometimes you can still roll it in glitter!
It’s possible to breathe life back into a crushed track with careful use of dynamics. We can also correct difficult problems, for example if your kickdrum is very loud in relation to the bassline (or the opposite with a weak kick & flabby bassline), it’s impossible to just EQ the problem away, but we can use cunning dynamics tricks to even it out & get your back bumpin’ on track.

We hope you find these tips useful. Send us your audio today, and see how we can give you the pro sound you crave.
-
 FREE track mastering demo: try online mastering on your mix£0.00
 -
 DJ Mix MasteringPrice range: £40.00 through £80.00
 -
 Analog Mixing and Mastering bundlesPrice range: £135.00 through £270.00
 -
 Detailed Mix EvaluationPrice range: £10.00 through £30.00
 -
 Stereo Mastering (save on 3+ tracks)£35.00


