We all love a classic Analogue Synthesizer. The warmth, the rich tones, even the circuit noise all add a certain loveliness that a software synth cannot match. The question of soft synth vs hard synth has a clear winner – one that weighs several kilos and comes in a box! Reissued synths are a way…
They say time flies when you’re having fun. Never truer than when spending the last 17 years working on amazing music. I don’t really talk about myself much at all (ever really), but 17 years is quite a while to be doing a job, so this post is a little bit about my journey so…
Mid-side processing allows you to separate the stereo signal of your mix into two components: the mid and the side. By processing the mid and side components independently, you can shape the stereo image of your mix in radically different ways. In this blog post, we’ll show you what mid-side EQ processing is, how it works, when to use mid side processing, and how you can use it to improve your mixes. We’ll also show you how to use hardware outboard gear to achieve it…
They are a way of measuring the intrinsic volume of a piece of audio, relative to 0dB – which is the absolute loudest signal possible in digital audio – in the same way that a cup can only ever be filled up to 100% full, and no more…
How do artists make money from their music in 2022? Getting your music on TV or in movies, games or advertising is one of the most lucrative ways. Instrumental mixes are essential to land these deals…
How to sound good on a podcast – that’s the goal of many aspiring creators. You create and record valuable content, edit it, and stream it… only to hear that it doesn’t sound as professional compared to some of your peers. There’s so much content available these days, listeners will switch off quickly if your…
There are several different opinions on the question of “What is the best volume to finish my master?” (or for the more technically minded “What LUFS should I master to?”). We can’t avoid mentioning the famous loudness wars in this article either, and the direction music mastering is heading. After many years spent racing towards the loudest master, is the loudness war over?
Having been a professional mastering engineer since 2006, I have a few opinions. I’m going to give my perspective on these questions and explain about LUFS, peak and true-peak (with as little jargon as possible).
The end point is finding the ultimate recipe for the best mixing and mastering finish for your music, and how to win the loudness war in 2021 and beyond…
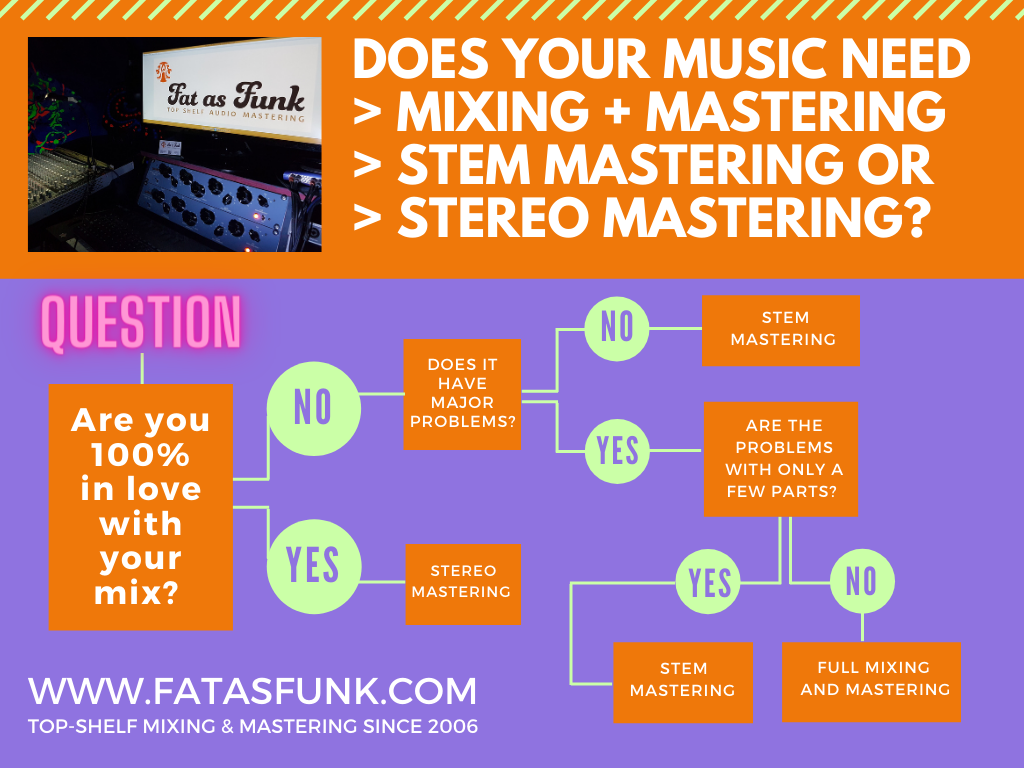
If you are wondering “How can I make my music sound better?” You may be considering taking your mixes to a pro, but are wondering what service your money is better spent on: professional mixing vs mastering, stem mastering or stereo mastering…
The article is about a professional audio mastering engineer’s use of Zen meditation to achieve a ‘flow’ state, which leads to effective results especially for complex projects. The author stresses the importance of identifying the right middle ground before adjusting dynamics in a record, a process facilitated by their approach of ‘thought without thought’ obtained through Zen. The engineer describes how ‘moving meditations’ and mindfulness enable deeper, non-distracted focus. The author employs Zen, not just technics, to enhance the emotional and artistic connection in a piece…
Releasing a vinyl record is an expensive business. It’s tempting to cut corners where possible to save money, and inevitably the question gets asked… “Vinyl mastering – is a separate master really necessary? Or can I use digital masters for vinyl music?
Short answer = You need a separate vinyl master for the best results.
Often masters created for digital use (Streaming/download/CD) are accepted by the pressing plant, so technically it’s OK to press on vinyl, but the end result is disappointing sound quality.
Using masters optimized for digital use to press vinyl will usually result in a slightly flatter sound, less dynamic range, various levels of distortion, skipping needles when playing back, and less overall “life” on vinyl – a crying shame after spending so much money on getting the records pressed!
“Can mastering save a bad mix?” is a common question. The short answer? = Yes…. to an extent. It’s always better to fix your mix at the mix stage, rather than waiting to fix the mix in mastering, but what if you don’t have the project file anymore, and still love the track. Do you…
How to make it in the music industry? Whatever musical path you choose, you will find lots of new opportunities by attending music industry conferences that happen around the world. We have some tips to help make the most of a trip…
Humans are the natural choice to master your music – A.I. bots are getting better all the time, but they can’t feel the rush of a hot performer, or the anticipation of a bass drop. An A.I. bot will never shed a tear when the violins rise up, or a surge of energy deep within them from a wicked riff. You can… We can…
One of the most common questions we are asked is “how do I prepare a song for mastering”. It’s an important stage to get right, as the quality of audio going into the mastering chain makes a big difference to the final result of the master. When you’re looking for the best song mastering services…
Now there are more opportunities than ever to become a professional DJ – and it’s a more crowded market than ever before because of it! So how do you get your mix to stand out to listeners, booking agents and promoters on common platforms like Mixcloud, Soundcloud, Spotify etc? Mastering is an overlooked step that makes you stand out as a pro DJ…
Time flies. Fat as Funk is 12 years old in a couple of weeks. A lot has happened. We were one of the very first to offer free mastering tasters back in 2006, and since then have had the pleasure of working on over 10,000+ tracks! We’ve seen the rise of some of our regulars…
We all love a classic Analogue Synthesizer. The warmth, the rich tones, even the circuit noise all add a certain loveliness that a software synth cannot match. The question of soft synth vs hard synth has a clear winner – one that weighs several kilos and comes in a box!
Reissued synths are a way of getting these amazing authentic sounds and the joy of owning a hardware classic, for a fraction of the price of the original. They are usually modernised with new features and connectivity, and sometimes notable negative points of the original have been improved. For example some early synths were notoriously difficult to tune (and stay in tune!) so by correcting these aspects, it can only be considered an improvement in real terms.
For the heretics (and value-hunters) among us I have also included a few cheaper unofficial Behringer clones of synth classics which are great in their own right, and deliver the goods for even less money. To be fair, Behringer have put a lot of love in to these reissues, boasting all-analogue signal chain, and circuit components that are as close to the originals as possible. I wouldn’t use Behringer products in my mastering chain, but their synths are fantastic, and in the cost of living crisis, it makes total sense to explore going “off-brand” in all facets of life.
If you are wondering “which synth should I buy?” here’s a quick guide to 15.5 (you’ll see why it’s 15 & a half later) of the best classic synth reissues, and a few controller keyboard recommendations at the end. Enjoy!
This article will be updated every so often when I see something else that’s groovy, so please bookmark & check back.
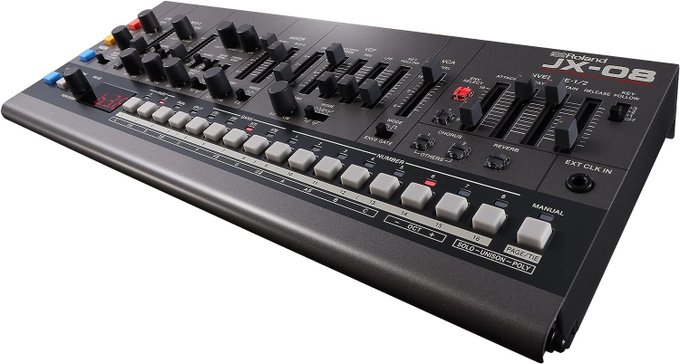
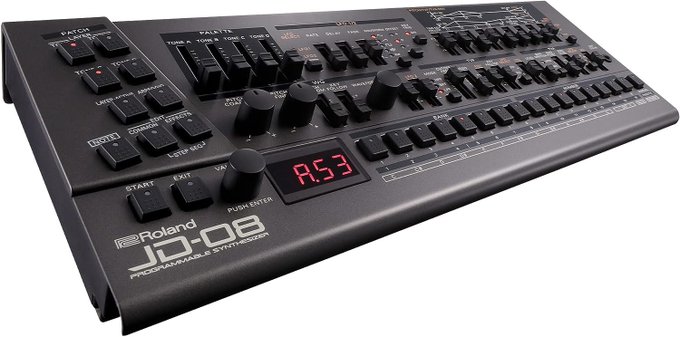
1) Roland JX-8p >>> JX-08
Modern Reissue of the Legendary Roland JX-8P from 1985 with New Effects, Polyphonic Sequencer, and More. I had a hardware JX3-p, its predecessor for around 20 years and it was incredible. The JX8-p is considered an upgrade, and this reissue is a beauty!
The Roland TB-303 (1981) is one of the most legendary in the world of electronic music. The reissue (TB-03) is a compact, affordable, and modernized version that retains the original’s unique sound. Aciiiid!
Behringer also make a clone of the 303 for an insanely low price, the TD-3-BK at Just over £100. Bear in mind an original 303 will set you back several thousand (IF you can find one), and just the manual alone sells for several hundred, this Behringer clone is an incredible deal.
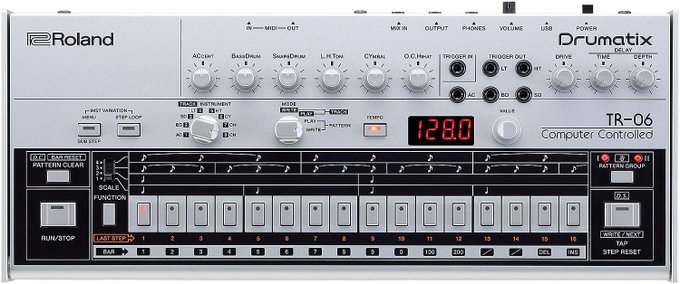
The TR-606 (1981) was designed to be paired with the 303, so a lone singer could have their own bassline and drums without having to organise a band. Then a swarm of electronic artists had different ideas, and music has never been the same again… The TR-06 reissue captures the chunky vibe of the original and adds a wealth Modern Upgrades
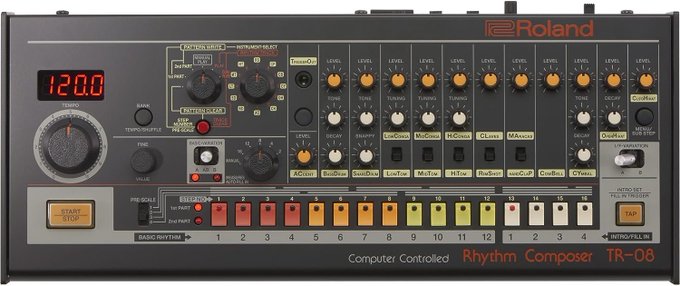
The Roland TR-808 (1980) is the most famous drum machine ever made. The backbone of House music and Hip-Hop, with heavy use across most other electronic genres too, it remains an essential (and incredibly expensive) bit of kit. The reissued TR-08 is a compact, affordable, and modernized version that retains the original’s unique sound.
The RD-8 Behringer clone also has an all analogue signal path, and is almost half-price again. They are shameless, yes, but also offer a great opportunity to producers who want the real analogue feel without spending too much dosh. 11 individual analogue outputs allows you to record or process your drums in multitrack.
The Nepheton by D16 is a high-end 808 VST with extra features.
5) Roland TR-909 >>> RD-9
Similar to the 808, but with harder sounds, the 909 grew to become the backbone for Techno and Industrial music, but features in almost all electronic genres too. This all-analogue clone is fat and chunky, with 10 individual outputs and reasonably priced.
TheDrumazon 2 by D16 909 simulator completes the holy trinity of classic drum machine VST instruments.
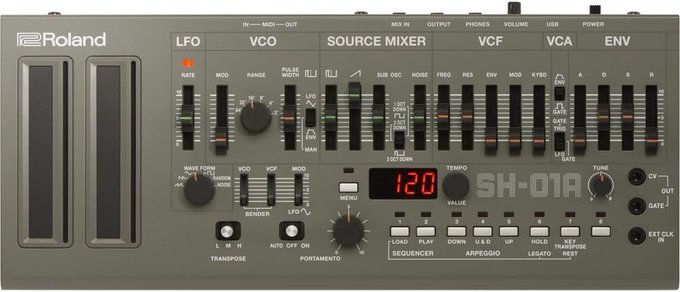
6) Roland SH-101 >>> SH-01A
The Roland SH-101 (1982) is a classic 80s monosynth which is capable of some truly savage tones. There’s just something about it which screams! The reissue (SH-01A) is compact, affordable, and has some new features.
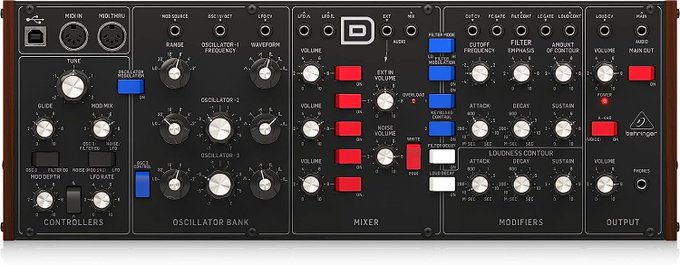
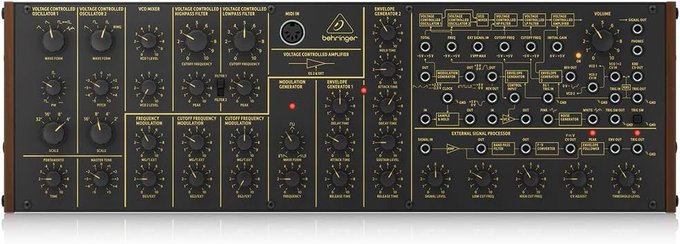
The Moog Minimoog (1970) is one of the most famous synths ever made, and for good reason. A true icon, the originals are incredibly expensive and rare, and mere mortals like us are unlikely to ever even touch one. The cloned Behringer Model D is pretty darn-tootin’ at a fraction of the price of an original.
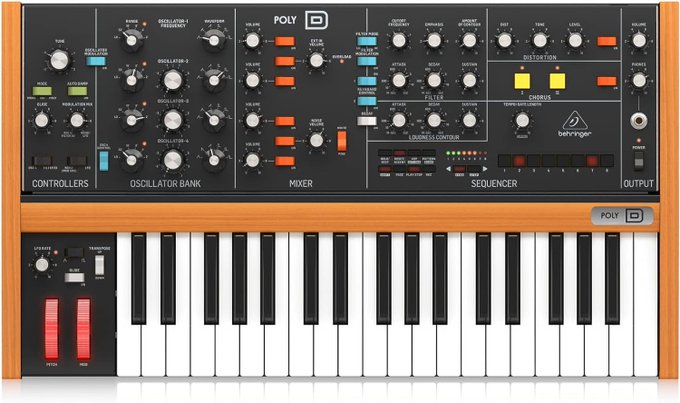
Here’s why the article is call 15 & a half synth reissues… there is also a polyphonic version of the Minimoog Model D which is also made by Behringer: The Poly D. It’s actually technically paraphonic, which can lead to new and interesting tricks by tinkering with the oscillators. Both these Behringer Moog copies caused controversy, with hardcore synth purists getting upset at their unofficial nature. But if you can look past that, they’re awesome in their own right and an affordable way to get a very similar analogue sound to the original.
A monophonic version of the immensely fat Prophet-5. The Behringer Pro-1 is a great-value clone if you’re looking for a synth like Prophet 5 which recreates the original circuitry and sound.
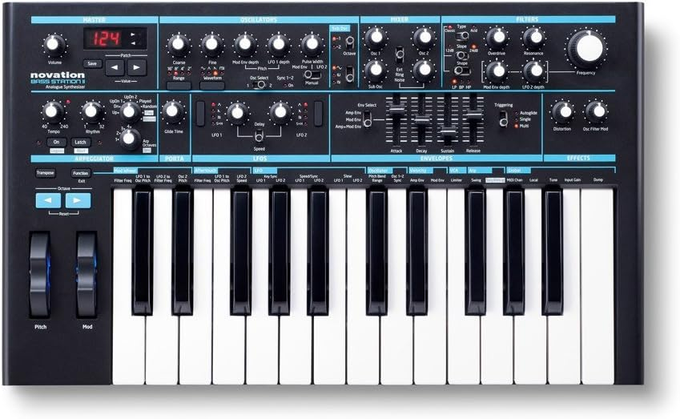
The original (1993) Should really be called the “sound station” due to its flexibility. Earth shattering synth bass, yes! But also lush soundscapes. I had one for many years, and it was a joy to play. The BassStation 2 has been around for a while, and the latest edition has USB and a few new features. Highly recommended.
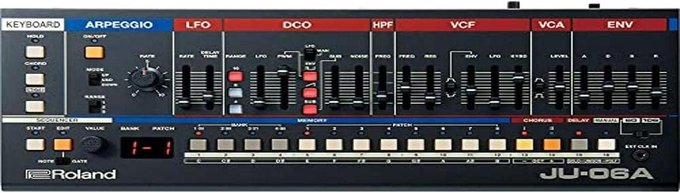
The Roland Juno-60 (1982) is a classic polyphonic synth. There was one at my college, and I spent as many lunchtimes as I could cranking it up and stressing the PA (and anyone in the surrounding area) with those immense filters. The reissue (JU-06A) is a compact, affordable, and modernized version that retains the original’s unique sound. WANT!
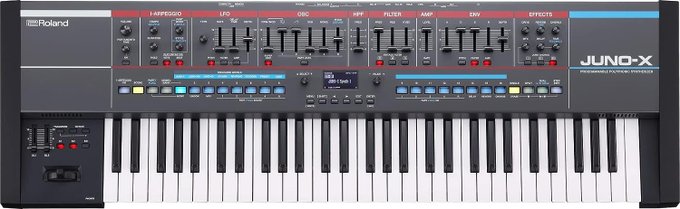
Not a straight “reissue” as such, but worthy of inclusion as the best bits of both these rare legends are combined in a monstrous reissued hybrid synth. The ROLAND Juno-X. Incredible.
This is a legendary synth (1978), and for good reason. Semi-modular and with a wicked filter. It’s been reissued twice – the Official Korg MS-20 Mini was overseen by the original team and is a faithful recreation – the only difference is it’s 86% of the size. I have one of these built in to my desk I love it so much!
Behringer have angered the synth Gods again with a much cheaper clone which is sick too. Heretics can pick up an extremely close version for about half the price.
In the spirit of “generational reappropriation” shall we call it, the original Octave CAT was a copy of the ARP Odyssey – a truly groundbreaking synth from the 70’s. Now Behringer have copied the Octave CAT, with their own CAT.
Finishing off on a legend. The WASP. This innovative and quirky synth quickly became ingrained into synth lore. This reissue has a wealth of modern features but keeps to the spirit of the original.
Some of these synths don’t have the keyboard attached and need a separate controller keyboard to actually play it, without resorting to using the mouse only in your DAW (yawn!).
In case you don’t already have a controller keyboard, or are looking to upgrade to one with lots of assignable knobs and faders for hands-on control of your DAW and soft synths, here are some great options.
C1) Nektar Impact LX49+
This is the exact controller keyboard I use, so can personally attest to its quality. The drum pads, faders and dials all feel great. USB MIDI Keyboard Controller comes with with Nektar DAW Integration. Recommended.
This lovely 61-Key Semi-Weighted USB MIDI Keyboard Controller Including Assignable MPC Controls with 16 Pads, Q-Links, Buttons and Plug and Play Connectivity is a beast. AKAI are a quality brand, and this is a winner.
Here’s the AKAI in a mini version to carry with your laptop. A 25 Key USB MIDI Keyboard Controller with 8 Backlit Drum Pads, 8 Knobs and Music Production Software Included
Since these analogue synth reissues have tweakable knobs and faders built-in already, you don’t necessarily need knobs and faders on your controller keyboard (although they are still very handy for connecting to Soft Synths). This portable 32 Key USB MIDI Keyboard Controller with velocity sensitive keys is a good value option.
For a larger keyboard and quality feel, but without paying for assignable knobs and faders, this USB MIDI Controller Keyboard with Nektar DAW Integration is a great option.
You can get several of these reissues for around the same price as one of the original rare beasts. Sure, the reissues might not smell as musty, or have as many stains as an original, but the sound quality is great and all these have been meticulously engineered to be as close to the original as possible. Have fun tweaking your knobs!
Once you’ve made some fresh tunes with your synth, consider sending it to us for professional mixing / mastering https://fatasfunk.com
They say time flies when you’re having fun. Never truer than when spending the last 17 years working on amazing music.
I don’t really talk about myself much at all (ever really), but 17 years is quite a while to be doing a job, so this post is a little bit about my journey so far.
Firstly, It’s been an absolute pleasure and privilege to work on all your amazing tunes over the years. I appreciate every one of you, from those just starting out in the game, through to some of the biggest independent labels, artists, sync agents, music libraries and pressing plants in the industry. I’m very glad to have made some real friends along the way too.
Far too many to name in this post without excluding others, but you can check out my (probably very incomplete) client list.
The Journey So Far
Fat As Funk was one of the very first mastering companies to offer a free taster back in 2006. This approach combined with trips to numerous music conferences and networking parties got me a lot of clients quite fast, and off we went. 17 years later and I’m not quite sure where the time has gone!
It’s really satisfying to help a new producer get their first release sounding as good as their inspirations, and hearing just how thrilled they are – wonderful! Take that enthusiasm forward and blow up your scene! Likewise when a band like Bilk drops their debut e.p. and it exceeds all expectations it’s great to have been a small part of it.
Also very satisfying seeing some tracks I’ve worked on getting major radio and DJ support all over the world, including several times the number 1 slot on Spotify for their genre, or a couple of times Radio 1’s “Hottest Record In The World Right Now” (Tommy Farrow “Let’s Just” and Prospa’s “Prayer”). Recently I noticed my regular client Lau.Ra did her first BBC Radio 1 Essential Mix. As a huge fan of the series growing up, this made me smile.
Occasionally walking into a shop and hearing something on the radio, like the ubiquitous “Another Lifetime” by Luxxury & Scavenger Hunt and”Keep It Together” by Kraak & Smaak which I keep on hearing in unexpected places a couple of years after their release.
Hearing my work in an A-List Hollywood trailer or movie is a buzz (especially when I’ve also helped land the sync placement, but more on that later).
A few times, artists have sent me a reference track to emulate for their mastering, and I come back to them saying “I mastered that one” and we have an instant “Ayyyyyyy!” Bro moment 🙂
I lost track of exactly how many tracks I’ve worked on a while back, but it must be well over 14,000 now. I’ve worked on music from literally every continent, and feel lucky to hear what’s cooking in the underground in some of the most far-flung corners of the world.
“The Underwater Hunter” by the Industrial Battle Orchestra. Mixed and Mastered by Fat As Funk.
Music S.O.S.
I get a special warm fuzzy feeling from rescuing old treasured recordings, sometimes for the families of people who have died, or an old-timer wanting to get their legacy in order and sounding great for their grandkids. They are so overjoyed to hear these wonderful memories restored, it makes me emotional every time. These jobs don’t happen very often, but they are always special when they do. I am currently cleaning up and augmenting some folk songs by a guy in the US which were recorded “on a $25 tape machine many years ago” including a song he recorded for his wife who died. There wouldn’t be a dry eye in the house if you heard it.
Likewise when the itch to scratch some vinyl comes around, but artists only have their masters pushed hard for digital use, and without access to the unmastered files we step in to solve the problem. Although people do sometimes risk pressing super-pushed masters on to vinyl, it is not recommended as they will often not translate brilliantly, and can even run the risk of making the needle jump if there are low frequencies out of phase. I have done a tonne of pre-vinyl rescue work over the years including for superstar Sophie Ellis Bextor and recently the controversial but critically acclaimed UK rapper Potter Payper.
We can optimise any tracks for the best vinyl results. Vinyl is so expensive to get pressed, there’s no point taking a risk at the last stage.
It’s a pleasure to make people so happy with their music. You can read some testimonials to see some nice things people have said.
Moving In Sync
I have also been working in the sync world for a while, visiting Los Angeles 6 times to hustle up direct connections in Hollywood and setting up a 3rd party licensing agency Rinse The Sync. This went pretty well, getting my artists music placed on many shows and films like Royal Pains (NBCUni), The Driver (BBC), A Hundred Streets, Spotless, The Five, Underworld:Blood Wars (trailer and movie) – all Fat As Funk mastering clients.
I have since moved away from 3rd party representation, and instead have set up a sync-focused music library Alternative Reality Music which has been picking up speed. It’s still fairly new, but I have a great sub-publisher based in LA, and we are starting to get placements on Netflix and other platforms. More of a slow burn, but also more sustainable.
I am looking to sign material in all genres for the library, and have signed up lots of tracks from Fat As Funk’s roster already for the catalogue. There is more chance of your music being noticed and pitched from a smaller library like ours than one of the huge ones with 6 million tracks. I am also gathering tracks for a different flavour library with a grittier, harder electronic edge. If you are interested, send me an email for more details (but use a different email address to the mastering one please:publishing (at) rinsethesync (dot) com )
I’m lucky to have had some of my own music placed too. Most notably landed some music and sound design in the international trailers for Alien:Covenant, Antlers, a Sprite advert, The Driver, had some of my sound design in the Logan trailer and music in The Book Of Boba Fett promo with a track I composed 50/50 with a buddy.
Some TV and Podcast Work
I came to the rescue for two series of wellness programmes on Sky TV “Feel Good Factor” on recommendation. The producers were having a nightmare as the sound recordist had ended the relationship on bad terms and left them with a load of extremely messy audio. Some of which was horrifically recorded, and they could not re-record the interviews due to Covid. I came in around part way though the first season and made the audio broadcast quality.
I have done various other TV mixing and post production, including remixing Ludacris’s tracks for the cool Netflix kids show Karma’s World for seasons 1 and 2. The same agency commissioned me to edit the music for a pilot cartoon show with Ronaldo and Messi called GOAT, which I don’t think ever came of anything, but was a fun job anyway.
I’ve recently been working on some spoken word audio including the excellent “Pitch Masters” podcast which is nominated for the MR2023 Podcast award. As a complete contrast, late last year I edited some rather fruity “adult” voiceover for the female-centered erotic story company Emjoy. Never done that before, but it was great fun! Never a dull day in the studio.
Final Thoughts
What I am most thankful for is the vast majority of my clients are regulars who come back time & time again, and most new clients come from their recommendations.
This means I have not needed to advertise at all for many years, and it also buffers against my rubbish social media presence haha (phew!). As I say every year… I must do better on the socials haha. Maybe this year will be the one…. Now that I mention it, If you would follow/like/share and all that stuff it would be appreciated. I often send out exclusive discounts on services to my email subscribers too.
As a lover of the countryside, I haven’t been tempted to move to London (although I do love visiting it), so have been able to keep my overheads low, and my prices extremely competitive. I truly feel Fat As Funk offers the best value:quality ratio in the business, and I’m very proud of that.
If I can help with mix evaluations, mixing, mastering, sync advice, vinyl optimisation, podcasts or anything along those lines, feel free to get in touch.
Likewise, if you have some excellent back-catalogue sitting around gathering dust consider sending it over for consideration into the library. Or you could write us something fresh!
So once again, thank you for being such awesome people. Keep the music coming! We’ll make it Fat As Funk together.
One of the most powerful and versatile tools in your mixing arsenal is mid-side processing. Mid-side processing allows you to separate the stereo signal of your mix into two components: the mid and the side. The mid component contains the audio that is common to both the left and right channels (Centre Mono), while the side component contains the audio that is different between the left and right channels (the Left and Right).
By processing the mid and side components independently, you can shape the stereo image of your mix in radically different ways, creating more depth, width, and clarity. You can also fix frequency imbalances, remove unwanted resonances, and create more contrast and separation between the elements in your mix. Alternatively you can use it in more subtle ways for mastering to enhance or fix a mix.
In this blog post, we’ll show you what mid-side EQ processing is, how it works, when to use mid side processing, and how you can use it to improve your mixes. We’ll also show you how to use hardware outboard gear to achieve it.
What is Mid-Side Processing?
Mid-side processing is a technique that allows you to separate a stereo signal into two components: mid and side. The mid contains audio common to both channels (mono), while the side contains the differences between the left and right channels.
By splitting the stereo signal into mid and side components, you can apply different EQ, compression or effects settings to each component, and then blend them back together to create a new stereo signal.
Mid-side EQ processing gives you more control over the stereo image of your mix, as you can adjust the frequency balance of the center and the sides of your mix separately. You can shape the stereo image, creating more depth, width, and clarity in a mix. You can fix frequency imbalances, remove resonances, and make elements stand out in the stereo field. Used subtly, mid-side EQ can also enhance a mix for mastering.
How to Use Mid-Side Processing with Software Plug-ins
Using mid-side processing with software plug-ins is very easy and convenient. Many software EQ and compressor plug-ins have built-in mid-side functionality, which allows you to switch between stereo mode, mid mode, and side mode for each EQ band, or compress the different elements separately.
We will use an EQ plugin in this example. Follow these steps:
1. Load a mid side compatible EQ plug-in (like The PSP Neon, Fabfilter or Pro-Q) on your stereo track or bus that you want to process.
2. Activate an EQ band that you want to use for mid-side processing.
3. Switch the mode of the band from stereo to mid or side, depending on which component you want to process.
4. Adjust the frequency, gain, and Q of the band as desired.
5. Repeat steps 2-4 for other bands if needed.
6. Adjust the output gain and bypass switch as needed.
Using software plug-ins for mid-side EQ processing gives you a lot of flexibility and precision. You can easily switch between modes, adjust parameters, and compare results. You can also use different filter shapes and modes for each band, such as low-cut, high-cut, bell, shelf, notch, etc.
How to Use Mid-Side EQ Processing with Hardware Outboard Gear
Using mid-side EQ processing with hardware outboard gear is a bit more complicated but also more rewarding. Hardware outboard gear can give you a unique sound quality and character that software plug-ins cannot replicate. However, most hardware outboard gear does not have built-in mid-side functionality, so you need to use some additional equipment and routing to achieve it.
Here are the steps you need to follow:
You need a plugin that can encode and decode mid-side signals, such as the Voxengo MSED
You need two channels of hardware EQ that you want to use for mid-side processing.
You need an audio interface, mixer or a patchbay that can route the signals from your DAW to your hardware devices and back.
Connect your mid-side encoder plugin to the stereo output of your DAW, to encode the output to M/S mode.
Usually the mid is on the Left output, and the Side is on the Right channel.
Connect the mid (Left) output of your encoder device to the input of one channel of your hardware EQ.
Connect the side (Right) output of your encoder device to the input of another channel of your hardware EQ.
Connect the output of each channel of your hardware EQ back in to to a separate input on your audio interface.
Add another instance of your MS plugin on the stereo input channel of your DAW. Set this one to Decode.
Activate input monitoring on this channel in your DAW, to listen to the audio coming in from the EQ in realtime. This should now be in M/S mode, and you have the ability to EQ the mid and side separately!
Record the MS EQ’d signal in to your DAW. You will usually notice it appears to be overbalanced to the left, however this is actually the mid, not left, and the mid is usually louder than the side! On playback, make sure you have an MS plugin set to Decode, to hear it naturally.
Now you can use your hardware EQs to process the mid and side components of your stereo signal separately, and then blend them back together with your decoder device.
Some examples of how you can use mid-side EQ processing with hardware outboard gear are:
You can boost the high frequencies on the side component to create more air and sparkle on your stereo image, while leaving the mid component untouched or slightly attenuated to avoid harshness or sibilance.
You can cut the low frequencies on the side component to reduce muddiness and increase mono compatibility, while leaving the low frequencies alone, or boosting them on the mid component to add more punch and weight to your mix.
You can notch out unwanted resonances or frequencies on either the mid or the side component, depending on where they are located in your mix, without affecting the other component.
You can create more contrast and separation between elements in your mix by boosting or cutting different frequency ranges on the mid and side components, such as making vocals more prominent in the center or making guitars wider on the sides.
Benefits and Drawbacks of Mid-Side EQ Processing
Mid-side EQ processing is a powerful and versatile technique that can help you shape and enhance your stereo image in many ways. However, it also has some potential drawbacks and pitfalls that you should be aware of before using it. Some benefits of mid-side EQ processing are:
It gives you more control over the frequency balance and tonal character of your mix, as you can adjust each component independently.
It allows you to fix frequency imbalances, remove unwanted resonances, and create more contrast and separation between elements in your mix.
It can help you create more depth, width, and clarity in your stereo image, as well as more interest and excitement for the listener.
Some drawbacks of mid-side EQ processing are:
It can introduce phase issues and artefacts if not done properly or excessively, especially when using linear-phase EQs or steep filters.
It can compromise mono compatibility if you make drastic changes to either component, especially on low frequencies or across a wide frequency range.
It can make your mix sound unnatural or exaggerated if you overdo it or use it for everything, instead of using it selectively and subtly.
Conclusion
Mid-side EQ processing is a technique that splits a stereo signal into two components: mid and side. By processing each component separately, you can shape the stereo image of your mix in radically different ways, creating more depth, width, and clarity. You can use mid-side EQ processing with software plug-ins or hardware outboard gear, depending on your preference and budget. However, you should always use it with caution and moderation, as it can also introduce problems and artefacts if not done properly. Mid-side EQ processing is not a magic bullet that will fix all your mixing issues, but rather a tool that can help you enhance what is already good in your mix. Use it wisely and sparingly, and you will be rewarded with better sounding mixes.
We hope this blog post has helped you understand what mid-side EQ processing is, how it works, and how you can use it to improve your mixes.
Here at Fat As Funk, we are extremely experienced in using various M/S techniques in both mixing and mastering, and we use the technique regularly.
When artists ask “How loud should my master be”, what they probably mean (technically speaking) is “What LUFS should my master be?”. But understanding the concept behind integrated LUFS vs dB (decibels) is essential, and can be confusing.
What are LUFS in audio? = LUFS stands for Loudness Units relative to Full Scale (or just “Loudness Units/LU”). They are a way of measuring the intrinsic volume of a piece of audio, relative to 0dB which is the absolute loudest signal possible in digital audio – in the same way that a cup can only ever be filled up to 100% full, and no more. You cannot push digital audio beyond 0dB without clipping (like overflowing in our cup example).
A cup with 100ml capacity can only ever hold a maximum of 100ml. The same theory holds in digital audio, where 0dB is the audio measurement equivalent of the maximum capacity of the cup to hold water.
Practically speaking, a LUFS measurement tells you the perceived loudness of a piece of music across a sustained measure of time, and this LUFS measurement is the most accurate reflection of how “fat”, “full” or “hefty” the track will sound compared to similar tracks, when played through the same Soundsystem, at the same volume (without any automatic volume levelling system).
LUFS are very similar to the more famous dB/decibel. Actually, in practical terms 1dB is the same amount as 1LU. So if you lower the volume of something by -3LUFS, you could also say you reduced it by -3dB.
So what’s the difference between dB and LUFS? Both LUFS and dB can be used to express a measurement of difference between 2 things e.g. “take the vocals down -2dB” (from where they are now), or a fixed volume reference (e.g. “the neighbours registered a noise complaint of 80dB” (compared to the base reading 0dB of the meter at measurement location).
The most important dB vs LUFS difference from a professional audio work perspective is that the dB scale represents how much air pressure a sound will produce over a very short time, and needs to be referenced to another point (which is standard air pressure) to get a measurement.
In contrast, LUFS is a unit of measurement measured from within the audio, relative to the loudest it could possibly be, and measured over a longer time.
So the LUFS measurement is more similar to measuring how much water we have in our cup with 100ml capacity. LUFS is measured backwards from full-scale (full capacity), so using our 100ml cup analogy again, if we had 90ml of water in the cup, you could also say you had the capacity of 10ml left, or -10ml to full capacity. If you only measured from an empty cup (with 100ml capacity available), through to to 0ml capacity left (a full cup), then if you had 50ml water in the cup, there would be -50ml capacity available… If you had 60ml water in there, the spare capacity measurement would be -40ml… If you had 20ml of water in there, the spare capacity would be -80ml etc.
Same idea for digital audio measurement: digital audio can only ever go to a maximum point before clipping (the cup overflowing), which is always referenced at 0dB (our full capacity). Both dB and LUFS are measured like this. So a measurement of -5dB means you can raise the volume up another 5dB before the audio clips (the cup runneth over). A measurement of -10LUFS means there’s a limit of another 10LUFS before the audio is the loudest it could ever possibly be (the full cup again). So if dB and LUFS are so similar, where does the difference lie?
Measuring audio using LUFS gives a more accurate picture of the track volume over a longer time (often the entire track is measured and represented). So a whole tracks LUFS measurement takes into account all the quiet sections and loud sections too, rather than just being measured at one specific point like with dB.
LUFS are the best unit we have to measure audio loudness at the moment, but when finishing a master you still need to use your ears rather than trust the numbers blindly, as so many other factors come in to play in perception of the listener, like genre, tempo, instrumentation and vocal styles. Especially if considering tracks across an album.
For some heavy music styles, the published target LUFS for Spotify may not actually reflect your musical intention perfectly either, and you will probably find your music lacks a certain “oomph” if you stick rigidly to the published targets!
If you want to read more about why LUFS standard for streaming may not give the results you want in all situations, and more info about LUFS when mastering check out this deeper dive article: How Loud Should My Master Be In 2022? Which covers questions like how many lufs should my master be, Spotify lufs, lufs for Soundcloud, lufs and true peak for Spotify and more.
What can I do if I don’t have instrumental mixes of my songs?
Special discount until the end of August 2022!
What is Sync Licensing?
How do artists make money from their music in 2022? Getting your music on TV or in movies, games or advertising is one of the most lucrative ways for musicians to earn serious money. This process is called “Sync Licensing”.
“Sync” is short for synchronisation. In music industry terms this simply means using music synched up to visuals in a project – almost every advert, TV show, movie or video game uses music synched up alongside the visuals. The process of a company licensing a track from an artist or agency to use in this way is known as Sync Licensing.
It is still common to land deals worth several thousand pounds, even for emerging artists (Fat As Funk works closely with various sync agencies in the UK and USA and has helped land artists many sync deals).
Loz from Fat As Funk at Capitol Records in Los Angeles, as part of a Sync Industry conference.
What are Instrumentals?
An instrumental is simply a version of your song with the lyrics or vocal tones silenced. Even slight vocal effects or “oohs / aahs” need to be muted for an instrumental version, but the underlying track tone and arrangement is identical to the main version. It is standard professional practice to get instrumental masters done at the same time as getting your main mixes mastered.
Why are instrumental versions so essential for sync licensing?
Often a music supervisor (the person responsible for choosing the music for a visual project) loves a track, but the project requires music with no vocals.
This could be for many reasons, including having a spoken voiceover which song lyrics would mask – and for the client, their message is the most important thing, and ultimately what they are paying to convey.
Some videos just work better with instrumental music! Lyrics could distract from the visuals, or dilute the message.
Often a TV show or movie will use both the vocal version and instrumental mix! Editors can use a vocal song where the lyrics help the scene, then cut seamlessly into the instrumental when the characters are speaking, so their dialogue comes through clearly. This flexibility is golden to editors, and music supervisors expect this flexibility.
Is it possible to get instrumental versions from vocal mixes, if I don’t have the project any more?
YES! We can remove the vocals from your mix as if by magic! Results are usually super-clean and often sound identical in quality as if you made an instrumental mix from the original project file.
Occasionally the process can leave slight vocal artefacts behind with some tracks, but it will be good enough to supply to a music supervisor with your main mix, and even worse-case will certainly be good enough to use behind dialogue.
Having an instrumental version is the difference between a music supervisor choosing your track over someone else’s. It is an essential part of the modern music industry, and even if you are not yet in the position to have music supervisors listening to your tracks, it is a no-brainer to get instrumental masters done at the same time as your regular mastering job.
We can also magically separate your track into its component parts (“Stems“) which can be even more useful for music supervisors. Check out our Magic Stem Creation Service too!
To get a hugely discounted rate on instrumental mastering, you should order the alternative instrumental versions at the same time as getting your regular masters done.
Just upload your main mixes and instrumentals to us (or order our magic instrumental creation service if you don’t have them already), then order Stereo Mastering (for the main masters) AND Alternative Version (for the discounted instrumental mastering).
We are offering a HALF PRICE deal on Instrumental Mastering until the end of August 2022. Just order as usual and enter the code: SUMMER22ALT at checkout!
To be extra-clear, if your track is only an instrumental anyway, you only need to book the main Stereo Mastering. If you are using our magic instrumental mix creation service, you still need to purchase the Alternative Version too, as these are separate services.
Make your musical ambition a reality, and start by getting your audio quality slick and professional. In this email I give some tips on stem mastering, and when it’s most needed.
Add 2 x FREE stems per track (£14 value) with code: 2022FreeStemsOffer Order “Stereo Mastering” then select “Add Stems” and use the code at checkout to get 2 x free stems!
(You can use the code up to 5 times! Get 5 x stem mastered tracks done & save £70! Code doesn’t expire until the end of June 2022. Scroll down for more details)
Topics covered: What is Stem Mastering? How can it help improve your music productions? How is it different to “regular” stereo mastering?
The difference between a good master & a fantastic master is subtle but important…. A great one just has “something special” about it, which noticeably adds to the overall impact of the track, but isn’t always easy to pin down why. It just sounds “quality”! Labels, sync agents, music supervisors and playlist curators notice the difference.Mastering is like most things in life – the better the input, the better the output. So today we are going to talk about Stem Mastering, which can help optimize a few of the most demanding parts of a mix as an integral part of the mastering job.
What is Stem Mastering? Stem mastering is like a mini-mix combined with mastering. It can optimize a mix that’s already great, or correct a few difficult elements and rescue a mix that would otherwise have major issues.A mediocre mix will be massively improved by an experienced mastering engineer anyway, but think how much slicker the end result would be if the tricky mix elements were perfected.Stem mastering is the process of sending certain parts of your mix separately, so the mastering engineer can adjust key elements individually during the mastering process.Often during mastering certain elements get highlighted and mix flaws revealed. It’s really useful for the engineer to be able to adjust these aspects on the fly to get the best end result.For example, there may be an instrument that overlaps the frequency band of a vocal performance, and during the mastering process the vocal needs a little EQ tweak… but this makes the other instrument sound harsh. Or vice-versa and adjusting a harshness in the other instrument then dulls the vocal. It would be helpful to be able to adjust these elements with a little more separation (there are A.I. tools that can be useful, but they are hit-and-miss sometimes).
When do you need stem mastering? Low-end problems (kick, bass, sub):Many technically excellent, talented producers don’t have the luxury of a fully accurate listening environment which can cause problems balancing their low-end. Matching the kick & sub levels between each other is a very common problem which relies on both accurate monitoring AND environment.There are a few A.I. driven tools on the market which are helpful, but in my experience they don’t quite get it right most of the time. I often use one in my chain, but the majority of the time (90%+) I don’t actually follow its suggestions completely, and use it more as a quick way to check another approach, like a second pair of ears to ask an opinion of. The neutral room + human ears still give the best results tailored to your track.Vocal balancing:A vocal is one of the most tricky parts to make sit naturally inside a mix, and because we all know the sound of a human voice intimately, a vocal that’s not quite blended perfectly is the easiest way to make an otherwise amazing mix go downhill. So many talented producers find getting the vocal to sit right the most challenging part of a mix. If this is you, you are not alone!The highest level mix optimisation:Even if your mix is pretty damn great already, and you just want to get the most optimized mastering possible, then stem mastering can make that happen. It gives the engineer full flexibility to tweak micro aspects of the master and get really precise for ultimate results.Weak sounding drums:A classic problem, especially when using live drums. The track is banging, guitars sound huge, vocal is great, bass is thumping, but the drums sound weak and let the whole track down. By sending the drums as a separate stem we can give the extra push needed to fatten them up in the mix.Any instrument that isn’t “sitting right”:Don’t let it annoy you. Send it separately as a stem and let the engineer fix this in the mastering.
How To Set Up A Stem Master: It is good general practice when mixing a song to group various elements to different subs/buses before the master output fader. This is helpful for many reasons: You can pull down just 1 fader to adjust all the drum channels for example, or effect all vocal channels with 1 effect. Or send different parts of your track to 1 reverb… Or many other cool things beyond the scope of this article! Sending grouped parts to buses is also useful in optimizing your gain structure to avoid clipping. It’s generally a good habit to have when mixing.When you export your mix, you will choose the option that exports all these different buses separately – these individually grouped wav files will be your stems.
There’s no specific rules for what parts to use as stems – it will vary depending on how many instruments are causing issues, or how complex your track is.Often you will only need 1 or 2 stems to get an optimized result. Vocals and Drums are common choices in this scenario.
For a rock stem mastering job, you might have the following stems: vocals drums bass rhythm guitars lead guitar synth
Or for an electronic track:
kick drum other drums bass sounds soft sounds hard sounds
This is a common stem setup for a dance track: kick drum Bass sounds everything else
Tricky vocal?: lead vocal backing vocals everything else (also makes it a breeze to bounce an instrumental master version at the same time)
Lots of options! Note how sometimes I’ve grouped them as “hard” & “soft” sounds – really it depends on the track and what elements work most naturally together.
Once you have chosen the best stem configuration for your mix, export them (“Export – Buses” or similar), then load them up in a new project and check to make sure they play back exactly the same as your normal stereo mix.
Feel free to reach out to us for advice if you have any problems making stems.
Send them all separately in a zip file to us HERE, along with a regular stereo copy of your full mix as a reference so the engineer can check all is correct.
Final thoughts: Stem mastering is not essential for every track. But on a tricky or complex mix it can make the difference between a good final result and a fantastic final result.
It doesn’t have to be expensive either. For example, at Fat As Funk Mastering, you can add a stem for just £7 on top of the mastering cost (or free with this offer!).Try stem mastering on your new track and see how much difference it can make.
Try our stem mastering for free: Add 2 x free stems per track with code: 2022FreeStemsOffer (Order Stereo Mastering + Add Stems, & add the code at checkout for the 2 x free stems discount per track. You can use it up to 5 separate times to get 5 x tracks stem mastered & save up to £70! Code doesn’t expire until the end of June 2022)
How to sound good on a podcast – that’s the goal of many aspiring creators.
You create and record valuable content, edit it, and stream it… only to hear that it doesn’t sound as professional compared to some of your peers. There’s so much content available these days, listeners will switch off quickly if your audio isn’t up to scratch.
Podcast mixing and mastering is the answer to your question of “How to fix podcast audio?”
The human voice is what our ears are most attuned to hear, so any minor podcast voice problems are immediately noticeable to any listener, even if they can’t detect what exactly the problem is.
There are a tonne of podcast audio editing tips on the internet, but even if you read it all, crafting your final podcast audio processing to get professional, radio quality results takes a lot of experience and confidence to know what sounds “right”.
Sometimes there is problem noise on the recording (Air Conditioning, computer fan, loud traffic etc.), maybe your voice volume is not consistent, and some words are too quiet to hear. Perhaps your sound FX are jarring in tone compared to your voice over. Maybe your podcast audio levels are not balanced between the voice and music. Or commonly, the whole thing is just too quiet.
How To Improve Podcast Audio Quality
The main things you can do to improve your podcast voice over is to record in a reasonably “dead” room (without a lot of natural reverb), use the best quality condensor microphone you can afford, and record your voice at a good level without distortion. Once you have done these basic steps, the task of getting the final product to sound like a professional podcast is the tricky bit.
Interviews via Zoom and other chat apps are common now, but unfirtunately Zoom podcast audio quality is poor. We can improve your podcast audio quality no matter where your source audio came from. We can also remove wind noise from location interviews.
Using a compressor on your voice to even-out the volume of your voice out is relatively easy – but doing it transparently, so it doesn’t sound “wierd” to the listener is quite a bit tougher. Even a slightly wrong setting on voice compression makes it sound odd to the average listener, and can sometimes even enhance any background noise present on the recording.
The Easiest Way To Improve Your Podcast Audio Quality
You may prefer to spend your time developing your content instead of stressing about this stuff, and leave the podcast audio post production to us.
We can fix podcast audio problems and get your content sounding amazing. It doesn’t cost a fortune either.
We can also edit and work magic on any audio issues in general – enhancing badly recorded audio, breath noise removal, and we can remove unwanted background noise from a recording while leaving your voice in tact and sounding natural.
Get in touch and let us know what’s wrong with your audio, and we will help. We can give you a free demo too, so you can hear how good you could sound with no risk.
Official loudness targets for different streaming platforms
How to “Win” the loudness war in 2023 and beyond
There are several different opinions on the question of “What is the best volume to finish my master?” (or for the more technically minded “What LUFS should I master to?”).
We can’t avoid mentioning the famous loudness wars in this article either, and the direction music mastering is heading. After many years spent racing towards the loudest master, is the loudness war over?
Having been a professional mastering engineer since 2006, I have a few opinions. I’m going to give my perspective on these questions and explain about LUFS, peak and true-peak (with as little jargon as possible).
The end point is finding the ultimate recipe for the best mixing and mastering finish for your music, and how to win the loudness war in 2021 and beyond.
How loud should my album be in 2023? – Here’s The Short Answer:
Your master should be finished to the volume it sounds best at to you, with consideration to what’s expected by the average listener for the genre. That is the sweet-spot.
You were expecting a measureable number? I’ll get to that, but there’s more to what’s the best mastering volume than one easy answer. I’ll tell you what is not the right approach:
It is NOT wilfully hitting a streaming platform’s published targets without a second thought for what’s right for the genre (more on this later).
It is NOT trying to get the loudest master just for the sake of it (or to “beat” your mate’s track), sacrificing dynamic range and punch in the process (never confuse volume with punch).
These days it’s best to go for what works best for your album, not try and fit in to other people’s shoes. This is not a “wooly” answer – there is no single right dB or LUFS answer. I’ll explain further…
(If you really need numbers now, skip to the “What’s the best LUFS for mastering?” section below.)
Playback Methods Have Changed
These days people consume music in more ways than ever before. From beautiful full-range systems to terrible speakers built into a phone. The playback medium matters too – if music is streamed from the internet, played from a CD, hard drive, vinyl or even old-skool cassette tapes which are now a “thing” again – all the formats have subtly different ways of handling the dynamic range, tone and volume of music.
The best mastering has to sound great on all these devices – that’s one of the biggest challenges for a professional mastering engineer.
A major part of this, and a long-running debate among record labels, producers and all the best mixing and mastering services is “How loud should my master be?“.
You have probably heard the term “the loudness war” – the unofficial battle between record labels asking mastering engineers to push the intrinsic volume of records to the maximum – trying to be the loudest track on every mixtape, and a louder CD than the previous.
This has been a hotly debated topic since the mid-90’s. One camp likes the more compressed, slammed, thicker, heavier finish – but at a cost of dynamic expression.
The other side prefers the more dynamic, bouncy, open, vibrant finish – but at the expense of aggressive volume.
This all got really silly in the early-mid 2000’s, with many album casualties being pushed so much they were transformed into worse versions of their original mixes due to over-agressive limiters being pushed way too hard.
Even naturally heavier genres like hip-hop, rock and dance music suffered casualties in the loudness war. Often the worst atrocities being committed by the biggest bands (Metallica “Death Magnetic” is probably the most famous, with legendary mastering engineer Ted Jensen actually distancing himself from the end result).
Most music will lose power and be made to sound weaker by pushing the intrinsic volume ever-higher. This sounds counter-intuitive, but is true. Without dynamic range there is no punch. Volume without punch is just noise – just annoying. You can always push louder – but there will always be a cutoff point where pushing louder is no longer an improvement.
Of course, different genres of music differ in their requirements. Mastering dance music will generally need a lot more heft than mastering jazz music or mastering ambient music for example. One of the reasons the loudness wars became such a problem was that many mastering engineers were applying far too heavy compression and limiting to softer material, killing the dynamics and making it sound crushed and lifeless – totally unnatural for the genre.
Cue listener comments like “the mastering is too loud”.
Often, I’m sure this was at the insistence of the client, not the mastering engineer’s decision (as a professional mastering engineer we can advise, but the customer always has the final say).
I often have new clients approach me with poor-quality masters done online by an automated service. Often some of the issues come from the track being too pushed, or not enough (usually too much). Setting the best mastering level for music relies on more than just numbers. AI is getting better all the time, but you still need a human for the subtle bits.
So how do you know what loudness is right for your music?
Before We Proceed – The Simplest Explanation of LUFS on the internet!
What are LUFS? Jargon-busting answer:
When artists ask “How loud should my master be”, what they probably mean (technically speaking) is “What LUFS should my master be?”
What are LUFS? = LUFS stands for Loudness Units relative to Full Scale (or just “Loudness Units/LU”). They are a way of measuring the intrinsic volume of a piece of audio, relative to 0dB – which is the absolute loudest signal possible in digital audio – in the same way that a cup can only ever be filled up to 100% full, and no more.
A cup with 100ml capacity can only ever hold a maximum of 100ml of water, if you try to add more than 100ml the excess just spills out, losing water. The same theory holds in digital audio – an audio file can only ever have its volume filled up to the maximum, and you can’t go beyond the finite limits without losing data (as if it spills out over the edge).
In digital audio, some key knowledge is that 0dB (Zero dB) is NOT silence, it is actually the loudest you can go. 0dB is our “full” loudest point, and going quieter is measured in minus numbers (so -25dB is actually quieter than -3dB).
Now we’ve got these basics out of the way, what do LUFS do and how are LUFS used?
Practically speaking, a LUFS measurement tells you the perceived loudness of a piece of music across a sustained measure of time, and this LUFS measurement is the most accurate reflection of how “fat”, “full” or “hefty” the track will sound to the listener, compared to similar tracks, when played through the same Soundsystem, at the same volume.
LUFS are also very similar to the more famous dB/decibel. Actually, in practical terms 1dB is the same amount as 1LU. So if you lower the volume of something by -3LUFS, you could also say you reduced it by -3dB.
So what’s the difference between dB and LUFS? Both LUFS and dB can be used to express a measurement of difference between 2 things e.g. “take the vocals down -2dB from where they are now“, or a fixed volume reference (e.g. “the neighbours registered a noise complaint of 80dB”.
The most important dB vs LUFS difference from a professional audio work perspective is that the dB scale represents how much air pressure a sound will produce over a very short time, and needs to be referenced to another point (which is standard air pressure) to get a measurement.
In contrast, LUFS is a unit of measurement measured from within the audio, relative to the loudest it could possibly be, and measured over a longer time.
So the LUFS measurement is more similar to measuring how much water we have in our cup with 100ml capacity. LUFS is measured backwards from full-scale (full capacity), so using our 100ml cup analogy again, if we had 90ml of water in the cup, you could also say you had the capacity of 10ml left, or -10ml to full capacity. If you only measured backwards to 0ml capacity left (a full cup), then if you had 60ml water in there, the spare capacity measurement would be -40ml.
Same idea for digital audio measurement: digital audio can only ever go to a maximum point before clipping (the cup overflowing), which is always referenced at 0dB (our full capacity). Both dB and LUFS are measured like this. So a measurement of -5dB means you can raise the volume up another 5dB before the audio clips and data gets lost (the cup runneth over). A measurement of -10LUFS means there’s a limit of another 10LUFS before the audio is the loudest it could ever possibly be (the full cup again).
But dB is measured only in comparison to another part of the setup. To invent a random example: your bass guitar is at full volume, and has -3dB headroom going into AMP #1 before distortion. But if you patch it into amp #2 it may have -8dB headroom, because the amps are built differently. So the measurements are accurate, but not as translatable.
Whereas LUFS for mastering is measured from within the audio file, using 0dBFS (full scale, or the loudest it could possibly go: our full cup analogy again).
LUFS could be viewed as a more modern, improved version of RMS which gives an average volume of audio. I’m going to say it – nobody really uses RMS much in mastering standards these days (apart from a few stragglers), so I won’t bother going into RMS beyond this mention. Use LUFS instead.
Measuring audio using LUFS gives a more accurate picture of the track volume over a longer time (often the entire track is measured and represented, sometimes just key anchor point sections). LUFS are the best unit we have to measure audio loudness in 2021 but it’s still not “perfect”. You still need a pair of experienced, human ears to translate this stuff beyond the numbers.
If you mastered an album of reasonably varied tracks all to a rigidly set LUFS level, without using your ears for a final check to see if it sounds right, you would probably find the album isn’t as cohesive as it could be.
LUFS are really useful, but your ears are still needed for a final check in the real world, as so many other factors come in to play, like tempo, instrumentation, vocal styles across the album etc.
For example, it’s very common for a track to have a radio mix + an extended mix. Chances are both these tracks will have different LUFS readings – because if the extended mix has a longer quiet intro, longer quiet breakdown and longer quiet ending, remember the LUFS measurement will take ALL the audio into account, and so the extended mix will have a lower LUFS reading than the more concise radio mix! If using an automated method of setting all the tracks to the same LUFS, then this would mean the Main Mix and Extended Mix could actually sound different, with the Extended mix being pushed harder (maybe too hard!) and could sound different across different playback systems with or without auto-volume levelling.
Also massively important is If the initial anchor point of the album is not chosen correctly, the entire foundation of the album may not be optimised. This is another factor where a human brain will always beat AI – because it hinges on an emotional response.
What’s the difference between Peak Level and True Peak?
The Peak Level of audio is another separate measurement of how loud your track is, and combined with LUFS gives a realistic picture of how your track will compare in the real world. Peak Level is measured in dB, and it’s how loud the loudest single peak of your track is, relative to 0dB (the absolute loudest it could possibly be in digital audio – the full cup). This is slightly different to how LUFS is used, but they work hand-in-hand.
Although LUFS and Peak are both measured relative to 0dB (how much capacity is left available to fill), Peak level sounds different overall to a LUFS measurement, because Peak Level is only measured at the one loudest point of the WAV, which can be a super-short sound (like 1 loud snare hit), rather than LUFS which measures the overall loudness of the track over a longer time.
Imagine recording an instrument with -7dB headroom, then suddenly someone slams a door taking the recording level momentarily up to -0.1dB. The bang is 6.9dB louder than the instrument, but the recording never clips (0.1dB peak headroom left before clipping).
This recording would technically be -0.1dB Peak Level: almost as loud as possible before digital distortion, but when you listened to the audio it would still sound quiet until the door slam – because the door slam is the loudest bit. So the Peak Level on its own doesn’t give an accurate real-world indication of how a listener would perceive your audio.
A LUFS measurement of the same audio would show a more accurate real-world result of somewhere around -6.4 to -6.9LUFS (depending on various factors including how long the measurement was): this measurement more accurately reflects the overall quiet nature of the audio file in the way our ears would perceive it.
The LUFS measurement would not ignore the big hit of the door slamming, but that 1 big hit wouldn’t massively skew the entire measurement like it would for a dB measurement.
So what’s the difference between Peak and True Peak?
Digital audio is very accurate these days, but it’s not bulletproof. Sample rate is how many times the audio waveform is measured (or “sampled”) per second. So a sample rate of 96kHz samples the waveform 96,000 times every second. Sometimes the point where the audio is sampled happens either side of a waveform peak, so the recording misses the exact level of the peak.
Imagine if you were watching someone throwing and catching a ball outside your window. You could see the ups and downs of the ball, but then if it was thrown higher above your window view, you would miss seeing exactly how high it went – because it went beyond your maximum vision. If the top of the window frame represents 0dB (the loudest we can measure) the actual height the ball reached, out of your vision, represents the true peak.
So bizarrely, audio that is badly clipped can actually have a positive True Peak of +dB. Which is only ever a bad thing, and not actually part of the sound – more of a measure of how much signal has been lost, but still taken into account by streaming platforms to avoid the possibility of clipping at the consumer end. This contradicts what I said earlier about digital audio being unable to go beyond the 0dB level, but understand a positive +dB True Peak measurement is not the same as proper audio. It is a measurement of how much data has been lost at that point.
Masters that have been pushed hard and finished to -0.1dB (the old standard), without a special limiter that deals with intersample peaks, can have True Peak measurements of +4dB or more – a major issue for streaming platforms, as you will read.
That’s the simplest explanation of LUFS, Peak and True Peak without getting into the technical jargon I promised I’d avoid.
What’s The Best LUFS For Mastering?
Most streaming platform guidelines state an ideal Loudness of around -14LUFS, but… I KNOW CATEGORICALLY FROM EXPERIENCE that if I deliver a dance/electronic/hard rock/hip-hop/breakbeat/punk/D&B track to a client finished at -14LUFS, they will INEVITABLY ask for it to be pushed harder! 99% of the time. Even if I explain the theory, they ask for it to be pushed louder anyway. Make of this what you will, but that’s the reality of mastering records professionally for other people, and hence the reality of how most released records are finished in the real world. More on this later…
The “correct” mastering volume is never a one-size-fits-all approach, but if you really want numbers (of course you do), I often find somewhere around -9LUFS to -11LUFS to be the sweet-spot for many styles of electronic and rock music.
For mellower material, I often finish somewhere around -12LUFS to -14LUFS.
However, depending on the intentions of the artist, and bearing the genre in mind, I will finish anywhere between a blistering -5LUFS (for insanely fat “pushed” sounding dance music – that’s TOO pushed in my opinion!) to -15LUFS (for gentle ambience).
In a nutshell I deliver what the client wants. I have a couple of clients who are quite big names, that I know to deliver at around -5 or -6LUFS because that’s what they want. Personally I don’t agree with that approach, but I’ve had the discussion & that’s what they want. Their music racks up millions of Spotify streams, so it would be wrong of me to consider them “wrong”. Food for thought.
Note: these measurements are for music designed for playback by consumer – I.E. record releases. Different, very specific standards exist for broadcast TV and mastering audio books etc. (but that’s for another article). Here we’re just talking records which have no rigid standards we must adhere to.
So, what LUFS is correct for mastering in 2022? = Whatever works best for your album or song and gives just the right amount of weight, bounce, bump n’ grind, the break point where joy happens for you. Whatever finish you feel represents your music and what you are trying to achieve – that’s the ideal mastering LUFS target in 2022.
“Hang on a minute buster! I thought Spotify/Apple/Youtube said you HAD to finish your masters at precisely -14LUFS, or they’ll kick your butt! What gives, Chum?“
Settle down, imaginary sceptic, I’ll explain:
What’s The Best Mastering Level For Streaming?
In 2022 music streaming services rule. The CD format is becoming rarer every year, and although there will always be vinyl fans (me included), it’s no longer a common commercial format for most artists. So it obviously makes sense to master with the main method of music consumption in mind.
Most streaming platforms like Spotify, Soundcloud etc. now have “normalising” (automatic volume levelling) built-in. This a great for the listener, because if you are listening on shuffle mode and an industrial rock track comes on after a mellow blues song you won’t suddenly be hit with a louder volume and have to rush to turn down the volume control.
There are a couple of different volume leveling systems being used, but the general idea is that they analyze the tracks intrinsic volume in LUFS, before adjusting the playback volume to compensate, thus leveling out the listening experience.
Many streaming platforms like Spotify, Tidal etc. state an “ideal” mastering level of -14LUFS, with True Peak of -1dB.
A track of -10LUFS, True peak of -1dB would have the Spotify playback volume turned down -4LUFS to match their standards of -14LUFS playback volume. A track with less headroom than -1dB causes a further playback volume reduction to compensate too, as it will adjust until the song also plays back at -1dB True Peak.
This “turning the volume down” is also known as the “Spotify Loudness Penalty”. More on that later, and why it’s less scary than it sounds.
You would think if you set your mastering output to -14LUFS with True Peak of -1dB then it’s already totally nailed, right? Sometimes, yes absolutely. But in the real world nothing is ever that simple, and if you follow that idea for every track or album, then you may not get the results you want in the end.
Most electronic, urban and rock music sounds a little weak and thin at -14LUFS, compared to the majority of records in their genre. For example, if you mastered a house, electronica, heavy rock, drum n’ bastype of track at -14LUFS, it will sound pretty lame compared a similar track that was finished at -10LUFS.
Understand that the -14LUFS track doesn’t just play back -4LUFS quieter, but SOUNDS less “full”, less “finished”, less “ballsy”, less “fat”…. you get the picture.
When I first learned about digital streaming targets a while ago, I started mastering music finished for those specs. Every electronic, dance, heavy rock or trailer music track I finished to -14LUFS got the same response from clients: “It sounds great, but can you squeeze a few more dB out of it?”. I explained about the targets, but they wanted more “ooomph”. In seriousness, I actually agreed.
So for these heavier genres of music I stopped finishing them to an arbitrary number, and went with my gut and ears again instead while still considering the streaming platform.
Because there are different playback systems, you may need differently finished masters, especially with the True Peak. A track finished for download would ideally have a True Peak louder than a track finished for Spotify. The solution = purchase an alternative finished version, as there is rarely an ideal “One size fits all” approach for heavy music.
Don’t get me wrong, I definitely think some forms of music definitely sound better around -14LUFS. Mellow acoustic music, singer songwriter, some orchestral, lighter reggae, light jazz, piano music and several other genres will certainly not benefit from being too “pushed”, and a -14LUFS finish may be appropriate.
Sometimes genres blur, certain sounds or instruments will lead the focus, perhaps it’s a drum-heavy track, or there are no drums at all, just an ambient drone. What if there is an album full of variation?
With so many variables, how do you decide what LUFS to finish at? This is where an experienced professional mastering engineer will make the call, and find the best finish for your track or album. Confidence, knowledge and an instant understanding of what is “right” which comes from years worth of experience.
For example I estimate I have completed around 39,000 hours of studio time (30 hrs per week average over 25 years, since getting really in to music production aged 16 in 1996. Probably more hours as I used to pull a lot of all-nighters in my youth).
The Problem With Only Using Numbers To Set Your Mastering Loudness
So much more needs to be taken into account than just aiming for a measurement. The tempo, orchestration, how it was recorded, the intended audience, the intended playback settings, the customs within each genre and the spectral and dynamic balance compared to other tracks on the same album should all have a part to play in the final loudness decisions. There’s no meter yet that can measure all those things as accurately as a trained human brain.
The various different streaming platforms are still refining their auto-volume leveling systems, and there is still a lot of debate over what is the best method to use, and ideal target too. These published streaming LUFS targets should be viewed as moving goalposts, and a guideline, not an unbreakable rule. They could change next year!
So, let’s take Spotify mastering LUFS standards for example. They state – 14LUFS as the ideal mastering level. So a -14LUFS master will essentially bypass the auto-volume leveling system and have no adjustment in playback volume when played on Spotify.
If you analyze your favourite dance, hip-hop or rock tracks (even new releases on major labels), I’ll bet you will struggle to find many that are actually finished to -14LUFS. I suspect you’ll find numbers more in the range of -12 to -8LUFS, maybe even down to -6LUFS : a long way off the published “ideal” -14LUFS streaming targets. Why is this? Surely if streaming is king, we must all follow their demands?
These real-world standards are partly due to 20+ years of the loudness wars, but also because some styles of music just sound “better” when they have been pushed a little harder. We as listeners have come to expect that full-fat, hefty sound from some genres, and often that needs a slightly higher LUFS master.
But that’s where auto-volume-leveling come in, right? Won’t Spotify iron out all these differences and make everything sound the same level anyway? So if you master to -14LUFS it will sound better than a track mastered at -11LUFS, won’t it? Sort of, but it’s more complex than just numbers. Many streaming platforms adjust for the True Peak too, so you can have a “pushed” sound, but if your True Peak has headroom then it will come out “louder” on Spotify for example.
In a real listening situation the listener’s perceived loudness of a track is very heavily weighted on on other factors beyond just LUFS and dB. The instrumentation, treble energy, punch of the bass, timbre, vocal performance (or if it’s an instrumental track) and the mixing style are all variables that combine to change how the listener perceives the track. Plus the listening environment itself has a major bearing beyond just a LUFS measurement.
Example: If you play 2 heavy electronica tracks back to back. Track A is finished to -9LUFS, track B is finished at -14LUFS. Let’s say you turn up the playback volume for track B by +5dB, to compensate for the mastering differences, so in theory, both tracks should sound the same volume…. What happens? Track A will still sound “fatter” to the listener, even though the playback level is technically the same. This is because there’s more power within the track itself, it’s “stronger” than the -14LUFS alternative.
Other camps will argue that the dynamics will be punchier in the -14LUFS master Vs. the -9LUFS master at the same perceived volume, and that is true… but dynamics punchiness is only one factor, andisn’t always the most important factor to consider for some music genres.
The lines can be blurred about what is “more important” in a track – dynamics or weight.This is key.
For some music, open punchy dynamics easily sounds best. Sometimes you want that “pushed” hefty feeling and sacrificing some dynamic range is a better option. It’s all to play for, and anyone who clings to one rule for all is missing the point – the mastering approach should be fluid, and optimised for the individual aesthetic required.
This is the indefinable sweet-spot of which I speak. This is the magic feeling we must capture in our master. What is right for the track, or album in a wider context. An AI online mastering service can’t define this – AI has never been raving, never crowd-surfed, never excitedly hugged its mates in a sweaty heap at a gig…. you get the idea. There’s more to enjoing and understanding music than numbers.
If 2 hypothetical heavy electronica tracks were played back-to-back on Spotify, the underlying volume of music in the room would be nice and level, but track A (-9LUFS) might well sound fatter and fuller than track B (-14LUFS). Probably NOT the artist’s intention for track B, aiming to sound fat!
Also, streaming services will turn audio down based on Peak Level, but currently they won’t turn it UP (remember this may change if/when they change systems)! So if you master a track to -14LUFS, and leave -2dB True Peak (as is preferred by some platforms), then it would sound -1dB quieter again than a track finished at -14LUFS with a TP of -1dB when played back on some platforms that prefer a TP of -1dB..
This volume-leveling can backfire in a more extreme way when faced with extremely dynamic material, like orchestral music which can have a long build of quiet followed by a few scattered big hits, which will actually then be affected by a built-in limiter on streaming systems to protect against unexpected clips like in this example – what are the chances that the arbitrary limiter response will fit your music musically? Hmm.
The recent house banger “Let’s Just” by Tommy Farrow (Stress Records) hits around -7LUFS in the chorus, sounds fat, loud, lovely and is a massive hit. But -7LUFS is a lot louder than Spotify’s preferred -14LUFS. Will that make it less favourable to Spotify’s algorithms? No, as he has made the front cover of the Spotify House Music playlist.
Likewise look at the runaway success of the Lau.Ra tracks Wicked & Don’t Waste My Time (Needwant). Both of these have been dominating the electronica charts, are all over a load of Spotify playlists, and are finished at a meaty -4.8LUFS: almost 10LUFS louder than the official Spotify guidelines (this extreme level was at the artist’s request by the way, but I do agree it sounds dope in this instance).
I’m not saying this super-pushed finish is the right approach all the time, but it does prove that the Spotify “Loudness Penalty” we touched upon earlier doesn’t penalise discoverablility, which is an important distinction to make.
I’m usually against pushing a track to these extreme LUFS levels unless the artist requests it or it really suits the track. But it proves anything can be possible and still get a great result if done well.
Dynamic, bouncy and open Vs. Tight, fat and solid. A good mastering engineer will advise, but at the end of the day the customer needs to be happy first, so we will always enable the artist’s vision, and at the end of the day, the customer is always right.
To fully realise your vision across all platforms, you may need 2 versions of your master: one for download/CD & one for Streaming.
Tommy Farrow’s track “Let’s Just”, mastered by Fat As Funk has over 2 Million Spotify streams and is pushed WAY harder than the “recommended” LUFS level of -14. It obviously sounds great to the listeners on Spotify.
Loudness Targets For Different Streaming Platforms
In the interests of giving you complete information, here are the suggested levels when mastering for streaming. If you’ve read the article above you’ll understand there are more factors at play in the real world, but here they are anyway:
Service
LUFS
True Peak
Apple Music
-13 to -15LUFS
-1 dBTP
Amazon Music
-9 to -13 LUFS
-2dBTP
CD
No “official” standard
-0.1dB
Club Soundsystem
Can be up to -6LUFS
-0.1dB
Deezer
-14 to -16LUFS
-1dBTP
Soundcloud
-8 to -13LUFS
-1dBTP
Spotify
-14LUFS
-1dBTP
Spotify Loud
-11LUFS
-2dBTP
Youtube
-14LUFS
-1dBTP
Published streaming loudness “targets”. Accurate as of early 2021.
How To Win The Loudness War In 2022 And Beyond
Looking at the long term picture, it seems important not to base your mastering decisions entirely on arbitrary number targets decided by streaming platforms (which are not totally agreed on yet, and will probably change several more times over the years).
It also seems like a bad idea to push for insanely loud LUFS for the sake of it when it’s generally agreed that auto-volume leveling is a good thing, and will only get better as it advances.
Shouldn’t we still fight in the loudnesswars? = Not any more (if you ever should have in the first place). Pushing your mastering too hard for the sake of winning the mythical “loudness wars” has been proven many times over to be an exercise in futility, and will ruin the dynamic detail of your track for a “quick hit” of volume. The loudness wars were also from a time when people bought a physical CD – when did you last buy a CD?
Nowadays with automated volume-leveling becoming more common in both playback systems and streaming services, it is less important than ever to try and be the loudest on the block. Also, don’t forget that every music playback system in the world has a volume control (and it’s usually the biggest dial right in the middle too).
Why permanently set your album masters for an outdated competition, for an outdated format, which was a bad idea in the first place? Or for a digital playback service that will probably change their standards several more times in the next few years.
All things considered, it’s often not the best idea to finish your master based on only the LUFS measurement given by a streaming service either, without giving priority to what’s best for the music, and the confidence to know what works best for the individual album.
It’s not usually the best approach to push your record beyond its sweet-spot just to be “louder than track (x)”.
Modern mastering standards allow you to let go of some worries:
Don’t worry about pushing it crazy-loud for the sake of competing in a phony war and sacrificing your dynamic range.
Don’t worry if your music slightly exceeds the suggested Spotify loudness targets, it will still sound awesome.
Don’t worry that your mate did a DIY home-master using headphones and free plugins that’s louder than anything you heard before… and louder automatically means better, right? (wrong).
Remember the old mastering engineers saying “it’s not how loud you make it, but how you make it loud”. Very true.
In a nutshell – the BEST mastering volume target for 2021 is What sounds best for your record based on what you want to achieve artistically.
We are happy to advise you which route to go beforehand, or explain our decisions afterwards.
We always mix and master for the level that suits your music best for your music, and will always make sure you love your final masters 100% – whatever the final LUFS!
With remote working now the accepted ideal, it’s no longer important to only think about “mixing and mastering services near me”, we have clients across the globe.
Upload your track to Fat As Funk now and try our mastering for free!
If you are wondering “How can I make my music sound better?” You may be considering taking your mixes to a pro, but are wondering what service your money is better spent on: professional mixing vs mastering, stem mastering or stereo mastering.
Below is an easy flow chart to help you decide, and we will briefly answer some common questions like what is the difference between mixing and mastering? What is stem mastering? We will explore stem mastering vs mixing and mastering.
Pro Mixing and Mastering packages:
Send us your recordings and we will transform them into a record! Get your mix as close to your vision as you can, then export your individual instrument stems (as many as you need) and send them over. Make sure you export all the parts from the same time, so it all lines up (usually from the very start 0:00).
We will give it a luxury analogue mixdown using our old-skool analog desk, valve hardware and 25 years of studio experience. We will then master lovely new mix and deliver you a radio-ready album you will be proud of.
Stem Mastering:
What is stems mastering? Stem mastering is like a mini-mix and mastering approach. It can optimize something brilliant, or correct a few difficult elements.
If your mix is pretty damn great already, and you just want to optimize it, then group the various elements together before exporting. E.G. group all the drums together in 1 stereo file, all the vocals in 1 stereo file, softer instruments, heavy instruments etc. Usually around 5 or 6 stems works well for most tracks. We will mix them back together, tweaking the individual parts so they sit perfectly together, use analogue summing then a fat analogue master for awesome results.
We can also save a mix using stem mastering. A classic situation is having a great backing track with a vocal or lead guitar that just doesn’t quite “sit right”. Or maybe you are not confident in you Sub/kick balance. We can stop your headache and ease your pain for pretty low price. Just bounce us an exported mix with the problem elements muted, then export the tricky elemements soloed. E.G. [Main track No Lead Guitars / Lead Guitar 1 / Lead Guitar 2] or for a dance track [Sub Bass / Kick Drum / Bounce Bass / Everything Else].
Stereo Mastering:
If your mix is already perfect and you are happy with it, then just send it over for straight-up stereo analog mastering. We will treat your mix like a queen, pamper it, give it some love, fatten it up, polish it shiny, make it sound expensive (but it won’t cost you too much). Fire it over. and we will deliver your awesome results.
Now you know what approach would suit your music best, upload your files and we will work some magic on your mix, and deliver you that pro sound you crave.
If you want to order stem mastering, simply choose “stereo mastering”, and add the number of stems you require using the “add stems for stem mastering” product.